
Since my childhood, I have been passionate about cars and everything related to them. Even at a young age, I knew every model. I spent hours flipping through car magazines searching for new facts and always dreamed of owning an exotic car. Initially, I used to dream of owning a Ferrari, but as I grew older and wiser, my love for Porsches just kept growing. A few years ago, Porsche launched the Porsche Panamera Sport Turismo. I was sold; in my eyes, it was a sports car that was also practical. Then, in 2019, came the (all electric) Taycan Cross Turismo, and a year later, the Taycan Sport Turismo. It was time to turn my dream into reality.
As a software developer who mainly builds websites, I was excited to learn that my car had an API. I immediately saw the potential: integrating my car with my smart home. Using Chrome DevTools, I spent hours exploring the MyPorsche website to understand how the API worked, since I didn't have access to official documentation. Through the TaycanForum, I connected with other developers who had already created some unofficial API interfaces. This meant I could start with the Homekit integration.
I want to clarify that the blog article I've written is purely out of my own free will and personal interest. I have no affiliation or connection with any brand or company mentioned within the article. Any opinions expressed are solely my own, and the inclusion of any products or brands is based on my own experiences and preferences.
A custom Homekit plugin
So, I wanted to create a Homekit plugin for my car. But why? The Porsche Taycan is an electric car, and I charge it at home. I wanted to handle the charging "smartly". At home, I have solar panels and a dynamic energy tariff. So essentially, I only want to charge the car when it's favorable. It could be during the day when there's plenty of sunshine or at night when the tariff is low.
Instead of checking the rates every day and hoping for sunshine, I wanted to automate this process. With sensors in Apple Homekit, this is possible. Through commands or automations, you can link states of sensors and actions with conditional statements. My hope was to start and stop the car charging process based on what my sensors say.
Homebridge
HomeKit is a framework established by Apple. Approved devices specifically made for HomeKit and devices that support Matter are displayed in the Apple Home app. With Homebridge, you can add your own plugins to extend the functionality of Homekit. The beauty of Homebridge is its compatibility with various operating systems, including Windows, Mac, and Linux.
To ensure that my smart home is always operational, I recommend running Homebridge on a dedicated server. A popular choice for this purpose is the Raspberry Pi, known for its reliability and efficient performance. Fortunately, Homebridge offers extensive documentation and support for installation on different operating systems, making the setup and configuration a smooth experience.
Porsche Connect API
Since the official Porsche apps offer the ability to invoke certain functions of my car, I knew that my car was somehow connected to the internet, and that I could communicate with it through an API. With Chrome DevTools, I did a lot of preliminary research and found various endpoints for different functions. This allowed me to easily read the endpoint when preheating the car or adjusting a charging profile via the website.
Just as I decided to create my own API integration in TypeScript, I came across a project where a lot of groundwork had already been done. node-porsche-connect provides most of the endpoints I would need for a Homekit integration. This project is based on a Swift project used by a much larger hobby project called 'Apple Sidecar'. For me, it was a perfect starting point. Credits to the authors of these projects!
The Porsche Connect API is self-explanatory. By authenticating with your Porsche Connect credentials, you can retrieve your cars via the API. Unfortunately, I don't have the luck of owning two Porsches, but if I did, the different cars would come back neatly via the API. Each car has a unique identification / VIN that can be used to send specific commands to the car. An example of an API response from a single car is as follows:
{
    vin: 'WPXXXXYYYYYZZZZ00',
    modelDescription: 'Taycan 4S Sport Turismo',
    modelType: 'Y1ADB1',
    modelYear: 2023,
    carModel: 'J1',
    engineType: 'BEV',
    exteriorColor: 'Gentiaanblauw metallic',
    exteriorColorHex: '#3b322c',
    steeringWheelPosition: 'LEFT',
    nickname: 'Taycan 4s ST',
    remoteCapabilities: {
        hasRDK: true,
        hasHonkAndFlash: true,
        heating: {
            hasFrontSeatHeating: true,
            hasRearSeatHeating: false
        }
    },
    permissions: {
        userIsActive: true,
        userRoleStatus: 'ENABLED'
    }
}
This data clearly shows what my car can do. I can activate seat heating, honk the horn, and more. But even though these features are available, there's still no way to automate the charging process, as you can see.
Through the MyPorsche website, I discovered that for hybrid and fully electric cars, additional endpoints are available where battery information can be read. But there are also additional endpoints to activate certain functions like "Direct Charge"
Supported vehicles
Before I dive into detailing all the sensors and accessories provided by the plugin, let me first list the vehicles it supports. As of March 2024, here are the supported models:
- Taycan (Model Year 2019 and newer)
- Macan (Model Year 2024 and newer)
While it's theoretically possible for the Panamera and Cayenne hybrids to be supported, I haven't had access to vehicles for testing. Interested in collaborating? Let's connect on GitHub!
Setting up the sensors
Before I wanted to control preheating or the charging process from Homekit, I found it important to offer characteristics of the car as sensors in my home. For this, I only needed the GET methods of the API, because I only retrieve information and want to display it neatly in my smart home.
Before I show all the sensors, it's important to know that Apple has a limited selection of sensors that can be used. As a result, I sometimes made choices that may not seem obvious. But offer everything that is needed. You can find a complete list of sensors and accessories supported by Apple here.
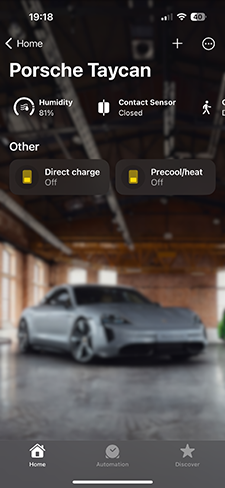
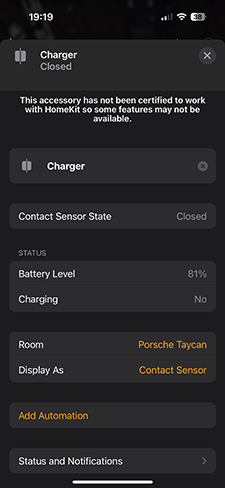
1. Charger contact sensor with SoC
First and foremost, I find it important to know: Is my car charging? I represent this using a contact sensor. Additionally, as a sensor characteristic, I have also implemented the state of charge (SoC), so that I not only knew if my car was charging, but also how full it was.
Because I've added the SoC, it's also possible to show in the Home app when the battery is almost empty. This can help you to charge the car even when the rate isn't favorable.
2. Charging power sensor (Lux)
And of course, when my car is charging, how fast is it charging? Using a light (lux) sensor, I indicate the charging speed of the car. At home, I charge with a 3-phase connection at 11kW, which in practice, due to voltage loss, is approximately 10.2kW. The lux sensor displays the charging speed in kWh as lux. If I'm charging at 10kW, the sensor shows 10 lux.
This sensor provides me with the ability to temporarily turn off other devices in my home when the car is charging. For example, if the charging power exceeds 10 lux, then turn off all devices.
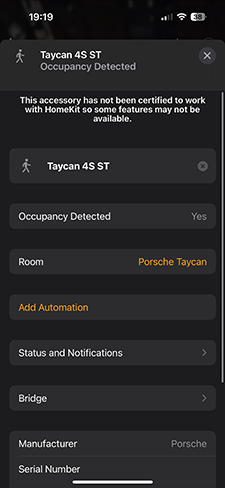
3. Location sensor (Occupancy)
I also find it important to know if my car is at home. Users of the plugin can specify the location of their home address in latitude/longitude. Using the coordinate data of the car, it can be calculated through triangulation whether the car is at home.
The state is displayed with an occupancy sensor. This can be used, for example, if you want to activate a camera in your Homekit home when the occupancy sensor is activated.
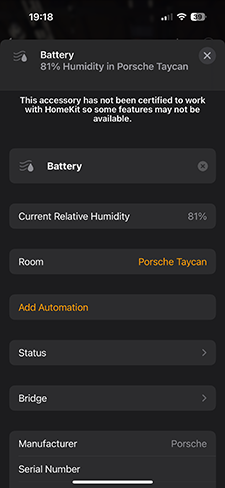
4. State of Charge
The SoC (State of Charge) characteristic with the Charger contact sensor, unfortunately, cannot be used in automations. To set up automations based on the SoC, this additional sensor has been introduced. There is no suitable sensor type available in Homekit, which is why I opted for a Humidity sensor. This neatly displays the SoC in the Home App, and you can base automations on the value, for example, if the value drops below 20 or rises above 70.
Setting up the accessoires
Now it's time to actually add new devices to my home. Since Apple doesn't offer vehicle devices, I had to think outside the box.
1. Precool / heat
This is probably the accessory that will be most used by users of the plugin. Because how great is it that when your Homekit-enabled alarm goes off in the morning, your car is preheated. After breakfast and showering, you drive to work (or other destination) and your car, car battery, seats, and steering wheel are heated. I use this automation myself daily, and I dare say that this is the automation with the most impact in my home.
To take it even further, I use the occupancy sensor to check if my car is at home around 4pm, if not the preheat is enabled again so my car is comfortable and warm when I leave work at around 5pm.
The Precool / heat is a switch accessory. This means you can turn it on or off. The car determines whether to heat or cool itself. This is based on the outside temperature and the temperature you have set on the AC in the car.
However, there is a small limitation with this switch. Precool / heat is always active for exactly 1 hour. So you want to turn this switch on or off exactly 1 hour before you want to have the result. That's why the switch turns on when my alarm goes off, giving me enough time for breakfast, a shower, and to pack my work bag. Additionally, there is something strange about this functionality, but it seems to be a bug with Porsche (at the time of writing is March 25, 2024). Even if you drive away with the car, the precool/heat is still active. So your battery is still being heated or cooled when you drive away or are already driving. This unnecessarily drains a lot of battery. Because this seems to be a software issue with Porsche, I wouldn't be surprised if this is fixed in the future through a PCM update.
2. Direct Charge
The Direct Charge accessory is a switch to activate or deactivate charging. At Porsche, this switch is used to charge the car up to 100%, regardless of what the profiles and timers indicate. We can use this same switch to force charging to start or stop. For example, when energy rates are favorable or when the solar panels are producing enough energy.
The result

Heartbeat
To ensure the sensors are as responsive as possible, a new connection is established with Porsche's servers every few minutes. The updated data is processed and sent to Homekit via the sensors. To prevent overloading Porsche's servers, requests from various sensors and accessories are bundled and sent as a single request.
That's why I opted to use TypeScript for developing the Homebridge plugin. Through a TypeScript interface, all accessories of the plugin are required to implement the 'beat' method.
Using the plugin
Installation and setup
To install the Homebridge Porsche Taycan plugin follow these steps:
- Follow the instructions on the Homebridge Wiki to install Node.js and Homebridge;
- Install the Homebridge Porsche Taycan plugin through Homebridge Config UI X or manually;
$ sudo npm -g i homebridge-porsche-taycan
- Edit config.json and add the Porsche Taycan platform. E.g;
{
    "username": "porsche connect username",
    "password": "porsche connect password",
    "pollInterval": 30,
    "batteryDevice": false,
    "chargingPowerDevice": true,
    "lowBattery": 40,
    "platform": "PorscheTaycan",
    locationConfig: {
      "lat": "latitude of  your home address",
      "long": "longitude of your home address",
    }
}
In above example the charging state and battery level are updated every 30 minutes. The battery level is considered low when the SoC drops below 40. No separate battery level device is exposed, but the current charging power is.
Conclusion
As I wrap up creating a Homekit plugin for my Porsche Taycan, I'm amazed at how my love for cars and software development seamlessly merged. It was the most fun project I've worked on and almost can't wait to buy a new car to experience it all again (If my wife reads this; I'm joking).


I'm way too poor to ever own a Porsche, but this was genuinely impressive. Super cool to see how far you took the integration. Hats off.
Really cool project. Quick question though. Does this work for hybrids too or only the full EVs?