
Recently, I purchased a HomeWizard Wi-Fi P1 Meter. This device provides me with insights into the electricity and gas usage in my home. With 4 solar panels installed, I anticipate generating excess electricity during the spring and summer months. Despite knowing the capacity of the panels, I am unsure of the exact amount I contribute back to the grid. Thankfully, the HomeWizard app offers a user-friendly interface where I can easily monitor this information.
As a developer, I aspire to do more than just monitor electricity usage. I want to implement intelligent solutions in my Homekit-based smart home. When my solar panels generate electricity, I prefer to optimize its use rather than simply exporting it back to the grid. Given the low return rates and the possibility of incurring charges for excess energy in the Netherlands, I explored ways to intelligently manage the available data.
In this blog post, I aim to document my experience integrating the Homewizard Wi-Fi P1 Meter with Homekit. If you possess a similar device, I hope to ignite inspiration for you to create your own plugin.
I want to clarify that the blog article I've written is purely out of my own free will and personal interest. I have no affiliation or connection with any brand or company mentioned within the article. Any opinions expressed are solely my own, and the inclusion of any products or brands is based on my own experiences and preferences.
Creating a custom Homekit plugin
Homebridge
Because HomeWizard does not offer support for integrations with smart homes, I was motivated to find my own solution. Fortunately, it provides an API, which allowed me to develop my own plugin. This custom-made plugin enables seamless integration with my Homekit-based smart home.
One of the powerful tools I utilized for creating my Homekit plugin is Homebridge, a versatile NodeJS platform. With Homebridge, you can add your own plugins to extend the functionality of Homekit. The beauty of Homebridge is its compatibility with various operating systems, including Windows, Mac, and Linux.
To ensure that my smart home is always operational, I recommend running Homebridge on a dedicated server. A popular choice for this purpose is the Raspberry Pi, known for its reliability and efficient performance. Fortunately, Homebridge offers extensive documentation and support for installation on different operating systems, making the setup and configuration a smooth experience.
Wi-Fi P1 API
The Wi-Fi P1 meter from HomeWizard comes with an API which is accessible on your local network. HomeWizard offers an excellent API Documenten website where you can find all endpoints and features.
To see your current energy consumption (or feed-in), only one endpoint is needed, which makes the work of creating a plugin easier.
<request>
GET /api/v1/data

<response>
{
   "smr_version": 50,
   "meter_model": "ISKRA  2M550T-101",
   "wifi_ssid": "My Wi-Fi",
   "wifi_strength": 100,
   "total_power_import_t1_kwh": 10830.511,
   "total_power_import_t2_kwh": 2948.827,
   "total_power_export_t1_kwh": 1285.951,
   "total_power_export_t2_kwh": 2876.51,
   "active_power_w": -678,
   "active_power_l1_w": -676,
}
For the plugin, only the value of the property "active_power_w" is needed. In the example above, the value is "-678". This means that my house is currently delivering 678 watts back.
Setting up the accessoires
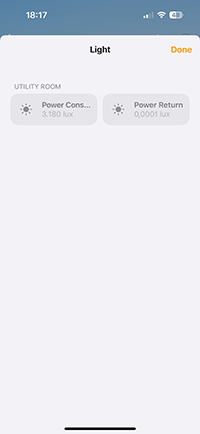
In my smart home, I prioritize understanding two critical aspects: 1) my current electricity consumption and 2) the current energy output of my solar panels. To fulfill these requirements, I intend to install two distinct sensors. By default, HomeKit lacks support for sensors not explicitly listed on the Apple website. Consequently, I must carefully choose a sensor that aligns best with measuring electricity usage. After deliberation, I've opted for a Lux (light) sensor. While typically utilized for measuring light intensity, I can configure this sensor to display either power consumption or energy output from my solar panels. This versatile adaptation allows for a seamless and convenient monitoring process, enabling me to effectively manage both my electricity usage and solar energy production within my home environment.
Heartbeat
To ensure that the accessories always display the most current values, the API endpoint is called every 5 seconds. As a developer, I am well aware that what I am building now will likely be expanded over time. In hobby projects, developers often have numerous ideas and are constantly engaged in further development and improvement. Therefore, it is crucial to handle API calls in a smart manner.
Avoiding overloading my Wi-Fi P1 Meter is a top priority, even though it is a local device. That's why I chose to use TypeScript. Through a TypeScript interface, all accessories of the plugin are compelled to implement the 'beat' method. This ensures that the API is polled every 5 seconds. After polling, all accessories are notified of the new data through a call to the mandatory 'beat' method.
This thoughtful approach ensures that the API endpoint is only called once every 5 seconds, instead of each accessory making its own call every 5 seconds. This not only minimizes the load on the meter but also optimizes the efficiency of the entire system. This ensures smooth operation, even with extensive usage scenarios and future expansions.
Using the plugin
Installation and setup
To install the Homebridge Homewizard Power Consumption plugin follow these steps:
- Follow the instructions on the Homebridge Wiki to install Node.js and Homebridge;
- Install the Homebridge Homewizard Power Consumption plugin through Homebridge Config UI X or manually;
$ sudo npm -g i homebridge-homewizard-power-consumption
- Edit config.json and add the HomewizardPowerConsumption platform. E.g;
{
    "platform": "HomewizardPowerConsumption",
    "ip": "<<ip address="" of="" your="" wi-fi="" p1="" meter>="">",
    "pollInterval": 5,
    "hidePowerConsumptionDevice": false,
    "hidePowerReturnDevice": false
}</ip>
Adding automations to my smart home
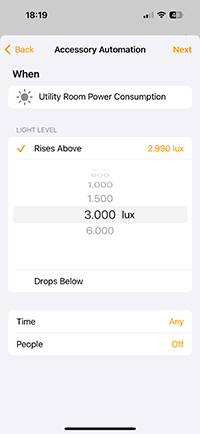
Because power consumption and return are provided as separate accessories by the plugin, the sensors can be used independently in automations. The Apple Home app allows you to add triggers to Lux sensors when the Lux value exceeds or falls below a predefined value. For example, it is possible to add an automation when the return delivery from the solar panels exceeds 3000 watts. In my house, I have set it up so that if my solar panels generate more than 600 watts, my electric bikes will be charged. And if consumption exceeds 10,000 watts, my bikes will no longer be charged.
Conclusion
In this blog article, I shared my experiences with the purchase of a HomeWizard Wi-Fi P1 Meter, which provided valuable insight into my home's electricity and gas consumption, particularly regarding my solar panels. However, there was a lack of integration options with my smart home via HomeWizard. Therefore, I took matters into my own hands by creating a Homekit plugin using Homebridge. By utilizing the available API of the Wi-Fi P1 Meter, I was able to integrate this data into my smart home and add intelligent automations.
With Typescript, I ensured that the API calls are efficient, with minimal burden on the meter itself. The installation of the plugin is straightforward and only requires a few configuration steps, after which I could use my sensors for various automations in my home. For example, I linked my electric bikes to the output of my solar panels, allowing them to charge automatically when sufficient energy is available.
Overall, this DIY approach has enabled me to elevate my smart home to a higher level and manage my energy consumption in a more informed and efficient manner. With the flexibility of Homebridge and the capabilities of the Homekit plugin, I was able to customize my home to meet my specific needs and preferences.